As promised, here is the video that Richard put together of the Moh Canada race. It looks great! Big congrats to Andrew for taking home the win. That's all for awhile on this project, but I'm already planning a big rebuild for next year.
Wednesday, 17 July 2024
Tuesday, 2 July 2024
Race Mower - Month 3 - Race ready and Race day!
Now that we had a stout rolling chassis it was FINALLY time to get this thing moving under its own power. That problem I had with the centrifugal clutch... well here is what I did. I bought a cheap centrifugal clutch online that fit a 1" axle but it was meant to drive a chain. I then bought a cheap 1/2" pulley just big enough to fit around the clutch. I cut the middle out of the pulley, and welded it onto the clutch.


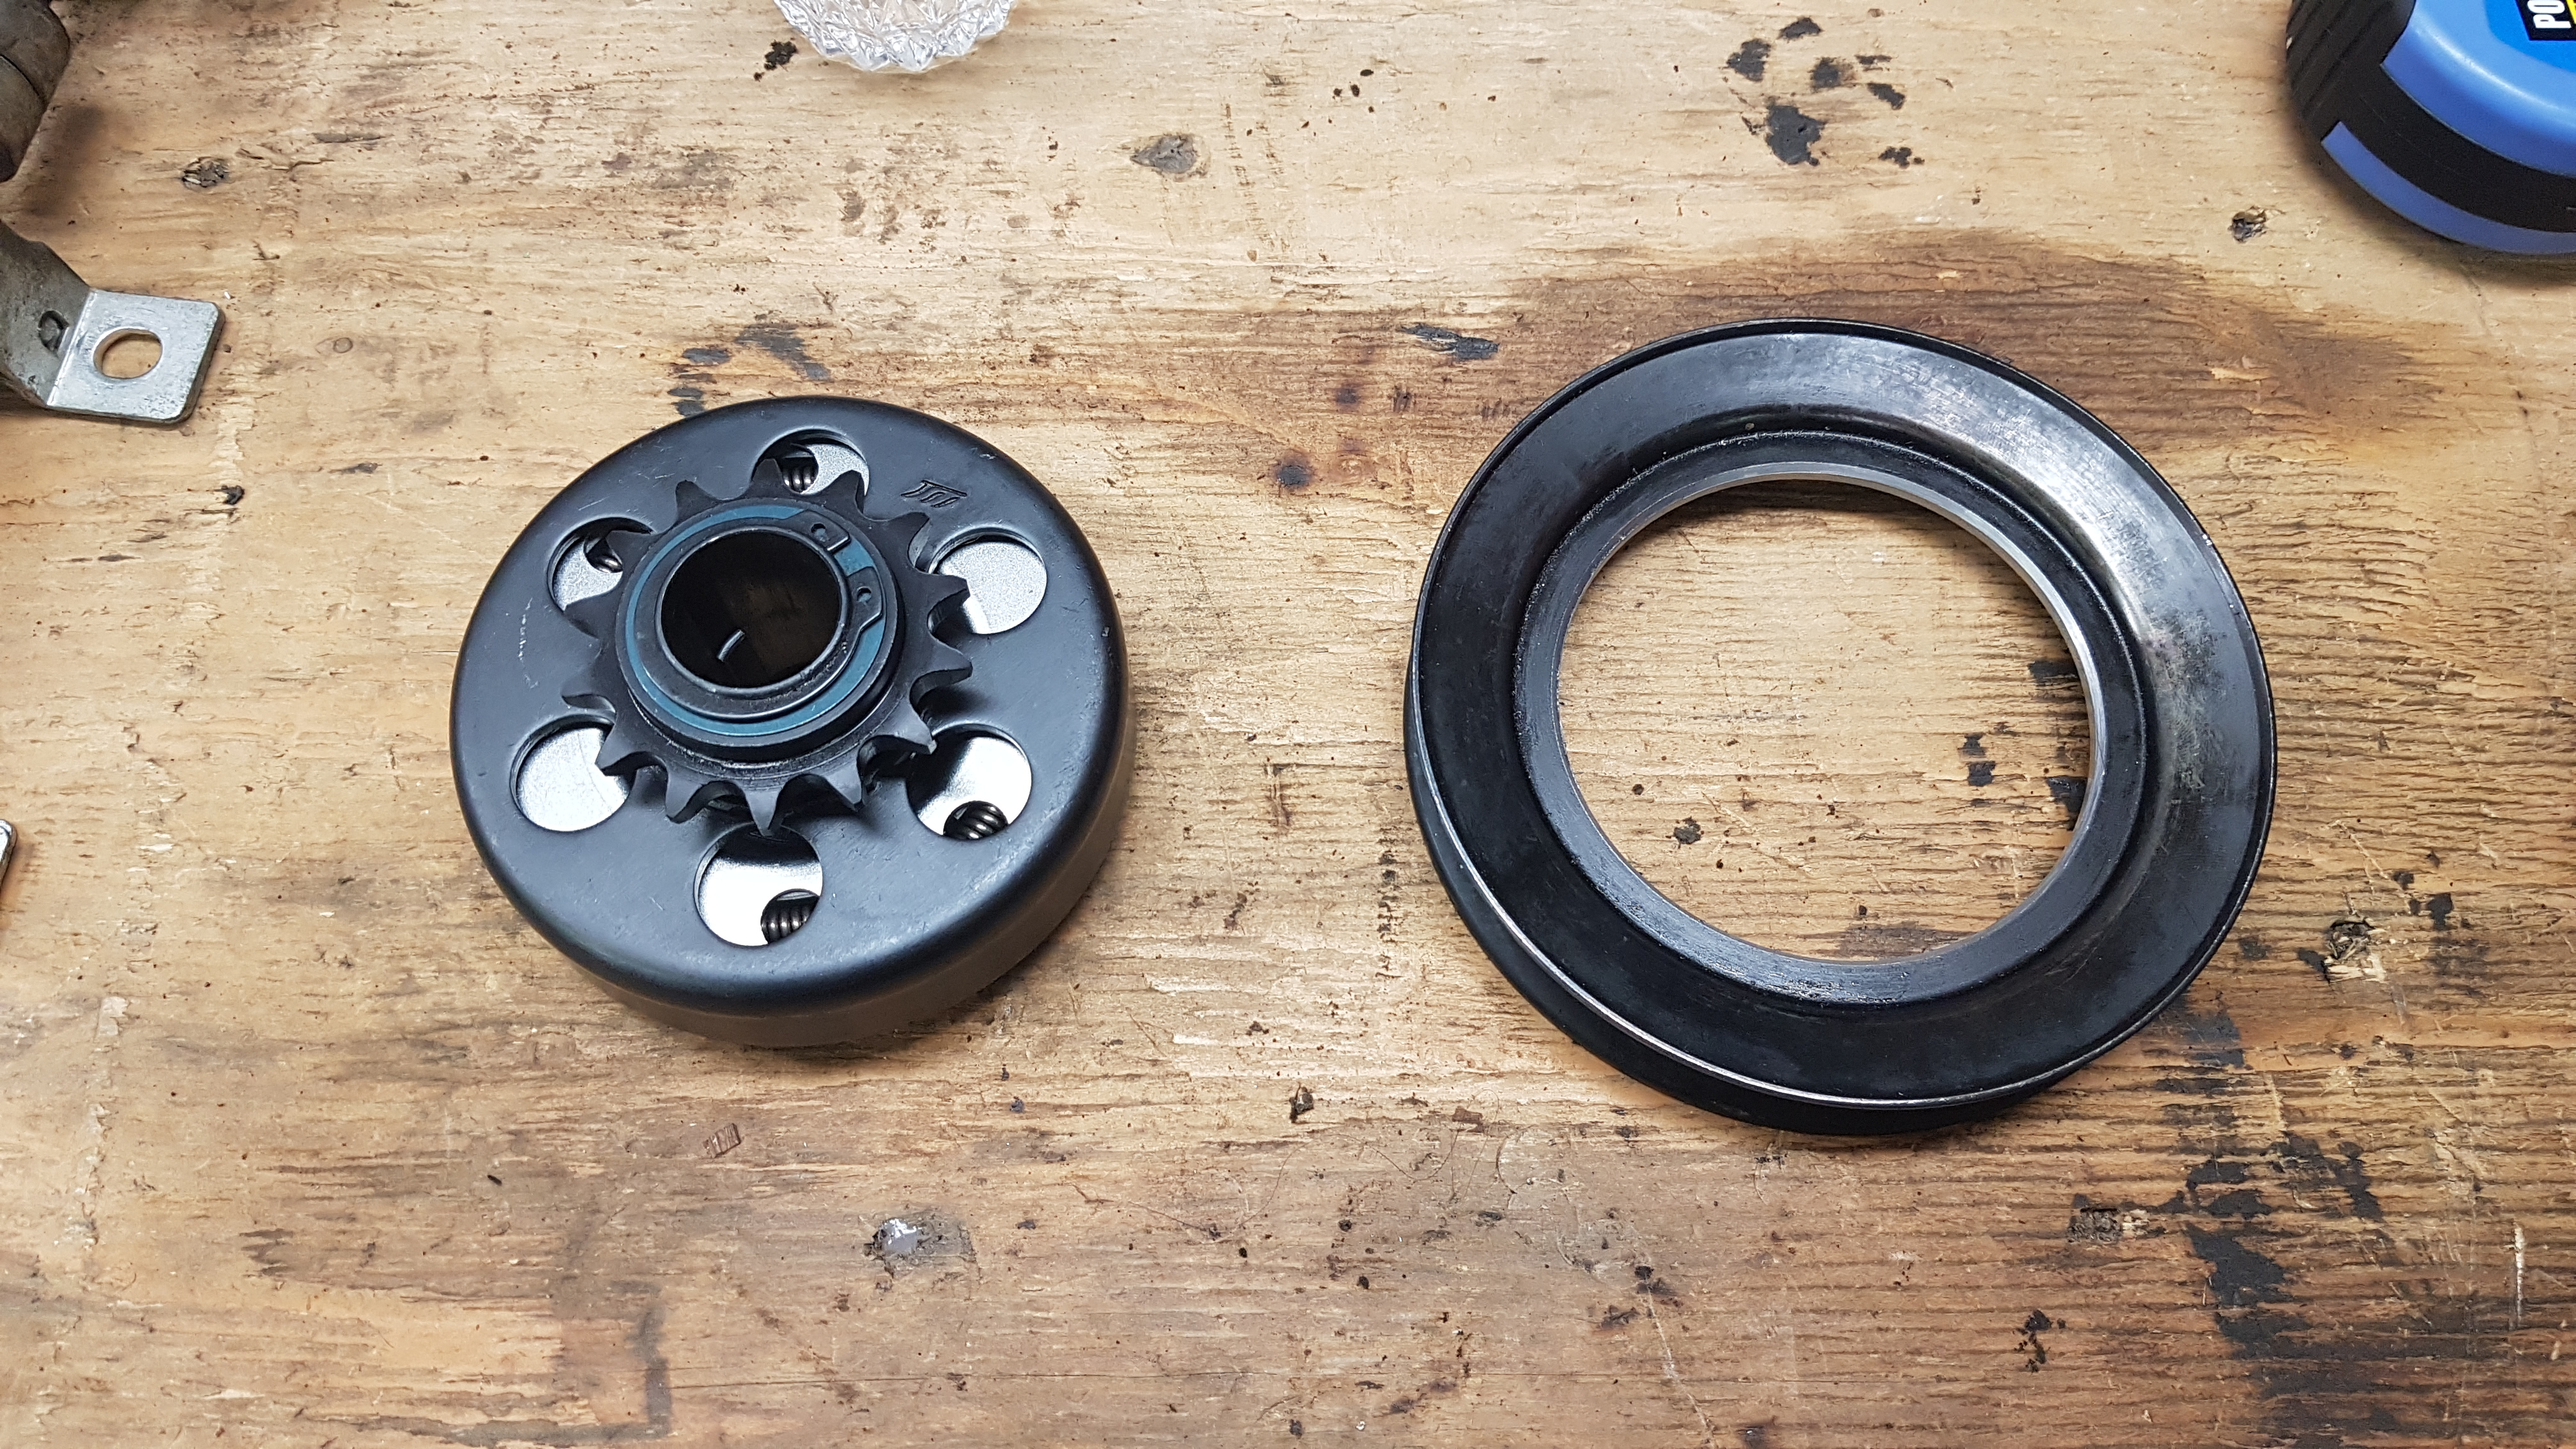

It worked surprisingly well. I did dunk the clutch in more dirty cooling water than I would have liked to, but I managed not to warp it or ruin the bearings in it. Mounting it was another small battle. I spent the better part of an hour on my back with a grinder, grinding and hammering all the pegs and guides and things that were in my way.

When it got to the first test fit the clutch slid on too far and rubbed on the motor case. I ground down some of the pin from the original pulley to use as a stop until it sat just right. Then I added a spacer on the bottom and bolted it all up in place. It was offset from the trans pulley by about a quarter inch but that was fine over the 19" distance. We dismantled the stock clutch pedal and utilized most or the under workings as a tensioner for our new belt drive system.

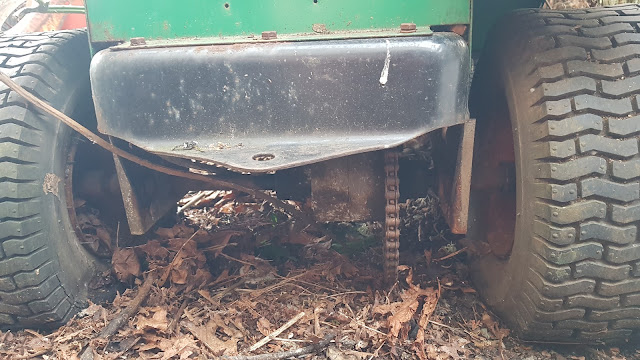
Next all we had to do was shorten the old chain to fit our lowered rear end with the smaller sprocket and we now had a connection from the motor shaft, all the way to the rear tires. It was time to see if this thing would move!
And it did!
Reaching into the hood to operate the throttle by hand, I got it running good enough to make a couple laps around the yard. The trans did in fact work and we had the makings for a drivable machine. Now it was time to add all the controls to drive it properly.

First was the choke cable. I found a generic choke cable with a lever from the hardware store. drilled out the face plate it came with, heated and removed the knob, then mounted it through the dash where the stock throttle once was. On the carb end I utilized a mounting hole from the old governor plate to attach the end of the cable.


Next was to mount the foot pedals that would control the gas and brake. They were a nightmare to figure out as they were meant for a go kart with a tube steel chassis. I ended up scrapping their way of mounting the spring and stop as it just wasn't going to work at the angle I needed them. I mounted the pedals to 3" long pieces of 1" square tubing and bolted the tubing pieces to the running boards.


The spring that came with them I ended up bending the end a bit in the vise so it would use the running board to spring against and screwed them down to it to act as the back stop to keep them from flopping over backwards. Lucky for me the bolts protruding through where the springs mounted to the pedals hit the tubing at just the right point to work as forward stops for the pedals. To hold the cable housing with the adjustment screws I just welded two oversized nuts to the side of the running boards and mounted it through those.

The stock air filter was long gone so I made this cool aluminum "tower of power" to hold a small aftermarket air filter. It screws onto the face of the carb from the inside and the filter can clamp on the outer diameter.

For the brake caliper it was an easy mount (also thanks to the available hoist that weekend). we used a couple long M8 bolts witch it was threaded for, along with a stack of spacers to mount it off the side of the chassis. We then set the disk inside it and clamped the disk in place on the axle using the set screw on the hub. The brake caliper had a simple screw terminal to hold the end of the cable from the pedal. After some quick adjustments we had working brakes.

We had to cut a slot in the floor for the brake disk to clear. Not my best work, but we were in a rush.

Dad was out racing so we stole his hoist for the weekend.

The final big piece was the throttle cable. I had to head back to school (off the island) so with the race under a week away my dad helped me out and figured out my throttle cable for me. He utilized the same mount point where i attached the choke. He drilled a new hole in the little plate on the throttle and used a rivet bent into shape for the pivot witch was then crimp connected to the cable. On the opposite side he mounted a spring to return the throttle when the pedal was released.

All that was left to do now were a few finishing touches. The steering wheel was a bit loose so I redrilled a bigger hole through the steering wheel and steering shaft for a new bolt. I grabbed the original seat mounting plate and fastened on a newer mower seat i had laying around. Lastly it got some fresh oil and it was time for a test drive.

I took it over to my buddy Nik's family farm for a test rip. It flew, but we lost gears, 1,2,3, and 5... Ooops. I guess i never did take a look at that transmission. A quick look inside and the fluid within had a color that could only be described as baby poo. With the race tomorrow morning there wasn't enough time left to dig into that. I added some heavy gear oil to the baby poo mixture and hoped that 4th gear would take this thing to the finish line. Or at least 1 lap, heck, id be happy if it pulled away from the start line.
Lined up at the start line (Nik's mower to the left)

That little mower did all that and more. Though we didn't place well we sure had fun, and we weren't even last. Part way through lap 1 of the first race we lost 4th gear, but seemed to regain 5th. It took me awhile to figure out how to get it up the hill in 5th, but after a couple running starts we were back in the race. We completed 5 laps and were still running at the end of the race. Race 2 we got 1 real good lap in before the transmission gave in altogether.

It was a ton of fun, and I hope to be back next year! I took the go-pro camera along for the ride and sent my footage to Richard from Turnbull Garage, who is putting together a video covering the event. Ill post his video on the blog when it is ready!
Race Mower - Month 2 - The rear axle.
Now it was time to make this thing move... or not. I wanted to change to a centrifugal clutch, and thought id just pull off the stock pulley to check the shaft size. It was seized on good! After I spent over an hour with pullers and hammers I had the stock pulley off the motor shaft. I was not about to put it back on.


The motor turns out to have a 1" shaft and unfortunately for me a 1" centrifugal clutch with a pulley is not common and would run me about $200. It was time to work on something else while I figured out the best move on this issue. Time to tackle the rear end.

There were a few tasks involving the rear end of this mower. One was to get some new tires on it since the old ones no longer held air, another was to lower it to match the front end, and since this was a race mower a smaller rear sprocket was certainly in order to get some more speed out of this thing. With that gain in speed it seemed only natural to add some stopping power somewhere (since it barely had any brakes in stock form) and upgrade the bearings.

*This bushing sandwiched between two plates was the stock bearing*

First I pulled out the old axle and dismantled it. The stock sprocket on the rear end had 55 teeth, and it was HUGE, in fact, it was the lowest hanging part on the mower so it was best to get a smaller one on there for that reason too.

I went into my shed and was blown away to find an old mobility scooter differential that was almost identical to my mower differential. It may make a fantastic spare in the future, but for now the most interesting part was the 27 tooth sprocket attached to it. It would effectively double my speed and by the looks of it was the smallest sprocket you could fit on that diff. PERFECT! well,... almost perfect. The chain and sprocket on the old mower was a #41 and this sprocket was a #40 witch is a thicker chain and sprocket. Luckily though the two sizes share the same pitch and overall profile so all I needed to do was make this one thinner. I took it to the lathe and turned it down to the correct thickness and re-chamfered the freshly machined side. The bolt hole circle to attach it was also different so I had to drill another set of holes in it to fit the mower diff.

Next were the brakes. The axle only has a keyways on the ends for the tires to attach to so I was not going to be able to use a hub with a key. I found a brake disk from an old ebike and turned a custom aluminum hub for it.


To attach it to the axle I ground a flat spot on the axle and used a set screw in the hub to hold it in place. I bought a cheap mini bike caliper and turned down the ebike disk to fit it. Probably would have been best to just buy the matching disk with the mini bike caliper, but I'm cheap and had the means to utilize a free one.

I disassembled the differential and regreased it before reassembling with the new sprocket and brake disk.

Now it came to mounting the rear end. The original bearings were nothing more than a couple bushings with some grease so we definitely needed an upgrade. I also planned to use some narrower tires so we could now mount the new bearings a little further out to increase support for the axle and allow us to run a standard pillow block bearing. I cut two pieces of angle iron to hold the bearings and mounted them up as far as they could go.

The rear end ended up a tiny bit lower than the front but I may eventually run larger tires in the back so this is no issue and was barely noticeable. Next was to test fit the axle and figure out some spacers. It turns out the matching rear tires from the same scooter I used for the front end fit the rear axle perfectly so it seemed only natural to use them. Now I would have 4 matching rims and tires. OCD very satisfied.


For spacers we ended up finding a set of cheap bushings that worked perfectly for us. Two on each side put us almost perfectly to the end. A couple washers to take out the slack and we had it sitting on 4 wheels again, now fully lowered.

That's all for this post. Next post its time to tie this all together. Belts, Chains, clutches, pedals, cables.

Sunday, 28 April 2024
Race Mower - Weekend 2 - Front end lower & better steering
It came time to dive into the thick of modifying this mower. The stock front axle on the mower was not set up for speed. It is tall and would likely get very shaky at higher speeds. The wheels are also loose on the spindles.

I dug through a pile of steering components from various mobility scooters I had parted out, and managed to find a perfectly suited pair of spindles. I cut them off the rest of the scooter steering arms they were attached to, and removed the front axle from the lawnmower.


I took the mower axle inside and got to work on removing the original spindles.

After some hammering, pressing, and grinding: I had the old spindles out.

I welded the new spindles right onto the ends of the axle. This widened it out a bit, and dropped it about 4". We set the spindles to have 6 degrees of camber and 6 degrees of caster.

I used the tie rod from the same scooter I took the spindles from, and extended it using a section of the stock mower tie rod. After the new spindles and tie rod were in place, I put it back on the mower with some wheels - to see how things were looking. We used the stock wheels and tires from the same scooter I took the other steering components from.


The big issue to solve in the steering was how to get the stock steering shaft assembly to properly drive our new spindles. In stock form: the steering shaft has a gear at the end that drives a small gear rack that pivots on a single point. There is a small arm extending from one end of the rack, and a rod runs from that arm to an arm on the stock spindle, to push it forwards or pull it back.

The issue was firstly that on the mower, the arm extending from the stock spindle was pointed outward over top of the tire, and our new spindle had and arm extending inward (in behind the wheel where it belongs). This meant if we hooked up our steering this way, it would steer backwards. Secondly, it wasn't exactly pointing inwards. It was sort of sideways, and was meant to be pushed from side to side - not forwards and backwards. Oh, and thirdly, the new spindle with the arm for the steering rod to connect to was on the wrong side.

The first thing was to reverse the spindles. I left the axle in the mower the same way to keep our proper caster (actually at first I just turned the whole axle assembly around, before realizing my mistake) and swapped the spindles around. This meant my tie rod had to move to the back, instead of the front. That worked out ok. To connect the rod coming from our steering rack, we were going to need some kind of pivot with arms at opposite ends - to reverse the direction of travel in the rod. In fact, to direct it in a sideways motion we needed the two arms at more of a 90 degree angle. Another scooter spindle would work great for that. I found the perfect spindle that was low profile, and bolted on top of the axle nicely. On the arm that normally would have had a tie rod going to it, I used a short tie rod to connect it to the arm on the scooter spindle. On the spindle itself, I welded on a piece of flat bar and drilled a hole to mount the mowers steering rod.

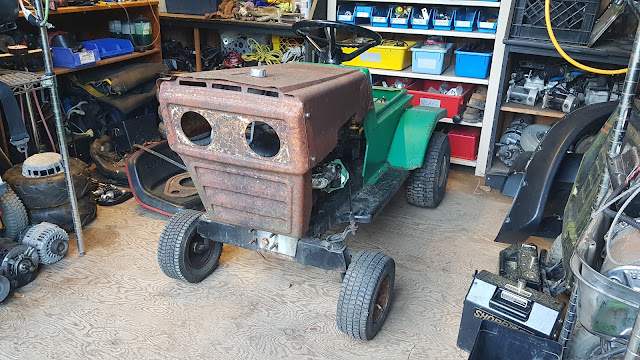
I now have a rolling chassis that has been lowered in the front a total of 3.5", adding the 4" spindle drop, and slightly larger tires. The steering is also much tighter than the original lawnmower steering, and is set up for taking corners much better. Next week I am going to put on a new belt, set up new throttle and choke cables, and see if we can get this thing moving under its own power.

Saturday, 20 April 2024
Race Mower - Weekend 1 - Drag er outta the bushes.
This mower was a project I had been meaning to get back to for almost 20 years. I purchased it when I was roughly 8-10 years old. I had accompanied my dad and my grandpa to look at a motor for my grandpas truck. The man selling the motor was selling out everything and there was this 1970s? Craftsman lawnmower, the perfect go kart for me.


We still need a new carb, but we know she runs and that's a great starting point. Unfortunately the belt blew off when we tried to get it mowing... I mean, uh... Moving, so we are gonna have to wait to test out the transmission. There's only one good tire on the front right now anyways, so we may as well put together our new steering and front tires. That's got to wait until next week though.


My dad and I worked on it for awhile at that time, but the project was eventually abandoned. It ended up outside in the bushes beside the garage, where it has sat for many years now.


Fast forward to 2023. One of my coworkers (knowing my interest in go-karts) asks if I happen to have a race mower. He informed me that there are a couple guys in the shop who have race mowers, and enter them in a yearly race. To nobody's real surprise: I did have a mower, and suddenly a reason to finish that project... Well maybe a little differently than my 10-year-old self had imagined.


I drug the old mower out of the bushes and gave it a good wash off. The main body of the mower looked really good for its decade plus in the rain. The hood that was freshly sanded did not fare as well, but was still good and solid despite the new pitting. When we got it all cleaned off and took a look, it seemed the project was most of the way along when it was abandoned.


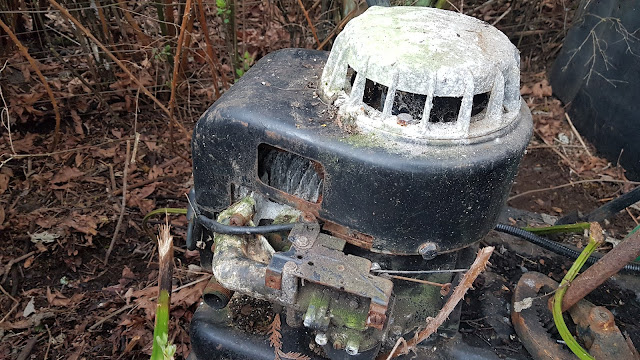
We had the whole thing apart when I was young, so it appeared we had gone pretty far in putting the mower back together. I stuck a battery in it just to see what would happen, and that was the real shocker. I hit the key and it turned over. It also sounded like it had compression. Now that I could see it might just run, it was time to get to work seeing if this neglected motor could run for us.

We took the flywheel off and cleaned up the points. After a few attempts at cleaning: we had spark. All we needed now was fuel, and this motor would theoretically run. We mounted the hood and grill (as the hood holds the gas tank). We also cleaned out the gas tank, and ran a fresh line and filter. My dad took to cleaning and setting up the old carb.

*Probably gonna leave the hood and grill rusty for that rat rod look.*

Would you believe the thing ran? It sure did. To my surprise: this old motor took little time to fire up, and with all the glorious roar to be expected of an old flathead with no exhaust.

^Tossed on some rusty moon caps from a scooter.^

We still need a new carb, but we know she runs and that's a great starting point. Unfortunately the belt blew off when we tried to get it mowing... I mean, uh... Moving, so we are gonna have to wait to test out the transmission. There's only one good tire on the front right now anyways, so we may as well put together our new steering and front tires. That's got to wait until next week though.

Subscribe to:
Comments (Atom)